
How to Simulate Water in After Effects
When I was hired by the Oliver Creek Church of Christ to produce a welcome video for the congregation, I used their logo and created the following introductory graphic:
It's been on my mind for a while now to write a post that shows how this graphic was created. Here's a step by step breakdown. Hopefully you will find this tutorial helpful in your own AfterEffects work.
CREATE A NEW COMPOSITION & NEW SOLID LAYER.

In my example above, I created a Black Solid and renamed it "Water." I named the composition "Water Flow." Make sure the solid is the same size as the composition's frame size.
ADD THE FRACTAL NOISE EFFECT TO THE SOLID LAYER.

You can apply the effect in one of two ways:
- Select the layer and then go to Effect>Generate>Fractal
- Click on the Effects & Presets tab to the right of your scree, search for Fractal Noise, then drag the effect and drop it onto your layer.
Adjust the parameters of the effect to the values in the above image. You can play around with the contrast and brightness levels to your liking. However, you want the effect to have some contrast, because that will help simulate the specular highlights you see when light reflects off of rippling water.
Your comp should now look something like this:

Okay, so we have something that looks like a very cloudy sky. This will be the basis for our rippling water effect. However, right now, it's static. We need to add some movement to the fractal noise effect, so that it looks as though the water is flowing.
To do this, twirl down the Water layer in your comp to reveal the Effects settings. Twirl this down to reveal the Fractal Noise settings. It looks like this:
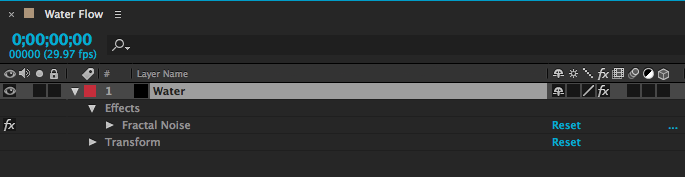
There are several different settings here, but the one you are looking for is Offset Turbulence. See below:

Notice the Offset Turbulence setting toward the bottom of the image.
You need to keyframe the Offset Turbulence setting at the beginning and end of your comp. Adjust the values so that the Fractal Noise effect is moving in the direction and speed that you like.
CREATE A NEW COMPOSITION AND NAME IT "FINAL RENDER."
This is the master composition that you will render out of After Effects for use in your video.
DRAG & DROP THE "WATER FLOW" COMP INTO YOUR "FINAL RENDER" COMP
The water is moving now, but it's still doesn't have color and the texture looks too soft. We need to harden the overall texture so it more closely resembles the look of water. To do this, we will use the CC Glass effect.
APPLY THE CC GLASS EFFECT TO THE WATER FLOW PRE-COMP LAYER.
Looking at the CC Glass effect in your Effect Controls window, you can see that there are a number of settings you can adjust. Here are mine:

The most important setting here is the Bump Map setting. Using the drop down menu, make sure that your Water Flow composition is selected. This tells the CC Glass effect which layer it should use as the pattern for the effect. You can now go in and adjust all other settings until you are happy with the look of your water. Now, it should look something like this:

You'll notice that the Fractal Noise effect has sharper, more defined edges. It's starting to look more like water. But our water still needs color.
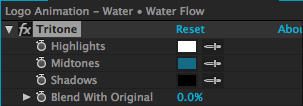
APPLY THE TRITONE EFFECT TO YOUR WATER FLOW PRE-COMP LAYER.
From here, you can control the colors of the Shadows, Midtones, and Highlights. I suggest keeping the Highlights white. This will give the specular effect you want when trying to simulate light reflecting off of the water's surface. Shadows need to remain black, in order to give you the contrast you need. The Midtones is where you can play around to find the right shade that fits your need. Mine looks like this:
And the resulting video looks like this:

Now that we have our water, we can layer on our logo and/or text. But I didn't want Oliver Creek's just to sit there static. I wanted it to feel as though the logo was actually on the surface of the water. To do this, you need to use the Displacement Map effect.
APPLY THE DISPLACEMENT MAP EFFECT ON YOUR LOGO AND/OR TEXT.
Once applied, look at the settings for the effect in the Effect Controls window. You will see a dropdown menu next to "Displacement Map Layer." From the dropdown, select your Water Flow pre-comp. This tells the Displacement Map effect to displace the logo/text using the parameters from the Water Flow pre-comp. Now the flow of your logo/text matches the flow of the water and it looks as though the graphics are floating in the water. See below:

And the final result looks like this:

Feel free to add your own questions or comments below. Also be sure to add links to some of your own favorite AfterEffects tutorials.